In one of my previous articles I described process of installation Mininet and OpenDaylight controller at VirtualBox virtualization platform. At this article I will show how to start simple network using Mininet, connect network to OpenDaylight controller and get your network topology visualized at OpenDaylight „topology“ tab. When you have your network from Mininet connected to OpenDaylight controller you have your test SDN environment created and you can play with SDN stuff such as yang models, restconf API, flows, Open vSwitch operation etc. This article will describe how to get Mininet network visualized at OpenDaylight GUI.
The first step is to create and start Mininet emulated network. To do that start Mininet virtual machine and log in. For this exercise we will create simple network with one Open vSwitch and three hosts attached to it. That is enough to demonstrate topology visualization at OpenDaylight. So, when you are logged at Mininet virtual machine type next command:
mininet@mininet-vm:~$ sudo mn –topo single,3 –mac –controller=remote,ip=192.168.56.101,port=6633 –switch ovs,protocols=OpenFlow13
mn is Linux tool for creating virtualized networks at Linux platform by using open source Open vSwitch and network namespaces. Open vSwitch is open source virtual switch for Linux and network namespaces are used for virtual adapters creating and connecting to Open vSwitch. For detailed info you can consult Mininet community site – mininet.org
Here are mn command options:
— topo – option for defining network topology. In our case single, 3 means that network will have one switch and 3 hosts attached
— mac – option to automatically set hosts MAC addresses
— controller – option for defining SDN controller. In our case we have OpenDayligh controller installed on different machine so we use option remote with IP address of machine where is OpenDaylight installed.
— switch – option for virtual switch definition. We use Open vSwitch with Openflow13
Next picture shows result of executing above described command at Mininet machine prompt:
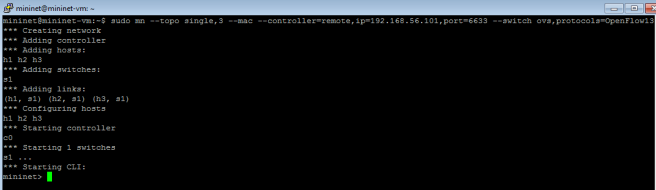
To open Mininet cli prompt I used Putty and made SSH connection to IP address of Mininet host-only network interface IP address (192.168.56.102 in my case). Then I logged in with Mininet credentials (user/pass mininet/mininet) and get Mininet prompt at which I can paste mn command.
Now, when we have our Mininet network started we should start OpenDaylight controller. In my previous article I described how to download and install OpenDaylight controller. When OpenDaylight virtual machine is started log in and go to folder where OpenDaylight karaf distribution is. For this demonstration we are using karaf Beryllium Open Daylight distribution. So, go to folder with OpenDaylight files:
drasko@ubuntu:~$ cd distribution-karaf-0.4.0-Beryllium
and execute next command to start controller:
drasko@ubuntu:~$ ./bin/karaf
and you get OpenDaylight cli prompt:
opendaylight-user@root>
When controller is started, if you did not install necessary features you should install it with next command:
opendaylight-user@root>feature:install odl-restconf odl-mdsal-apidocs odl-dlux-all odl-l2switch-switch
With above command I installed next features:
odl-restconf – feature for using restconf API to manage controller
odl-mdsal-apidocs – feature for automatic creation API documentation
odl-dlux-all – feature for OpenDaylight GUI
odl-l2switch-switch – l2 switch feature which is necessary for switching packet through Mininet Open vSwitch because Open vSwitch is openflow switch and it cannot forward packets without controller. l2switch is module at controller and do learning switch function for Open vSwitch. Controller automatically send flows to Open vSwitch.
Here is the screen from OpenDaylight controller with results of controller starting and feature installation:
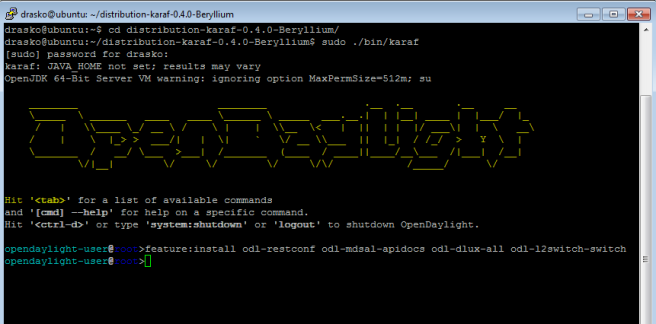
To open OpenDaylight VM cli prompt I used Putty and made SSH connection to IP address of virtual machine host-only network interface IP address (192.168.56.101 in my case).
How we have our network environment started and we can check network topology at OpenDaylight GUI. But, before open GUI execute pingall command at Mininet prompt to initiate packet distribution using l2switch controller functionality. After that controller will be aware of whole Mininet topology. Here is result of pingall command:
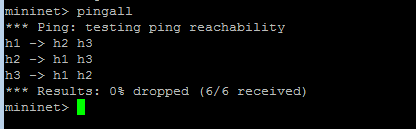
Result of command should be as at picture because ping should work correctly.
Now we will try to display our topology at OpenDaylight GUI. Open GUI at next URL:
http://OpenDaylighthost:8181/index.html
and input admin/admin credentials (OpenDaylight host is IP address of OpenDaylight VM host-only network interface).
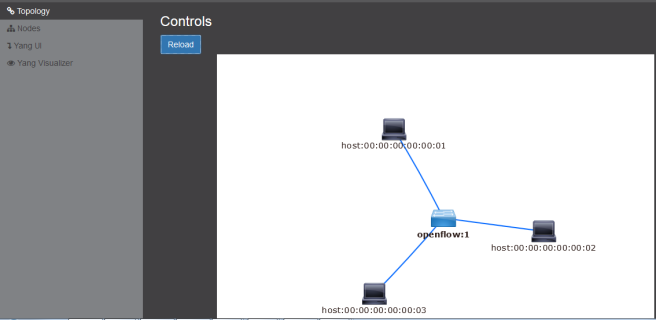
When you are logged in GUI go to „Topology“ tab and click on “Reload” button. Now, you should have Mininet network topology displayed:
If you have problems with topology visualization do pingall command again and click on “Reload”.
Enjoy!

Now I have installed the mininet and the opendaylight and followed the same steps by creating the network but when the reload pressure does not display the network what is the reason?
LikeLike
Try to do ping command and check if it is sucessfull. If yes, reload the page and check result.
LikeLiked by 1 person